Thứ Sáu, 26 tháng 2, 2016

Hướng dẫn tùy chỉnh cài đặt AUTO Clash Of Clan (ver CGB 5.x)

***Hướng dẫn đăng ký VPS, không cần dùng máy tính của bạn để cắm AUTO: CLICK

BIG UPDATE 09/05/2016:

- Hôm nay mình share cho mọi người Tool AUTO đã chỉnh hết mọi thứ, chỉ việc download về và mở lên chạy, chúc các bạn FULL KHO :D

*LƯU Ý ở bản này, vì DE (dầu đen) lúc nào cũng full kho nên mình train lính Minion, bạn có thể bỏ nếu cần DE (cơ mà bản AUTO này DE mình lúc nào cũng FULL, mà up KING QUEEN không kịp nên dùng :D)

- Ảnh DEMO:

***Download AUTO: CLICK (Đợi 5s bỏ qua quảng cáo góc trên bên phải là có link download mediafire nhé)


------------------------------------------------------------------------------

Như đã hướng dẫn ở phần trước, giờ đây chắc hẳn có nhiều bạn đang chật vật không biết nên tùy chỉnh cài đặt như thế nào để auto có thể hoạt động một cách hiệu quả nhất. Sau đây là hướng dẫn set up auto CGB v5.x (tương thích với bản cập nhật tháng 12 của Supercell).
1. Tải bản CGB (Clash GameBot) ver 5.x:
Các ver cũ hơn hiện không tương thích với bản cập nhật tháng 12 của Supercell (Big Update với việc mở rộng diện tích thêm 2 ô cho Your’s Village).
Bản cập nhật mới đã hạn chế khá nhiều việc farm nhà hoang, tuy search ra nhà hoang có hơi lâu hơn trước nhưng vẫn đỡ mất thời gian anh em ngồi bấm “Next”.
Link tải: tại đây.
2. Cách setup cho bản CGB ver 5.x:
– Tab Troops:


** Combo Barcher là hợp lí (train lính nhanh, tỉa collect ngoài) – không quan trọng trophy.
– Tab Search:
** Chọn chỉ đánh Deadbase để khỏi sợ bị report tới Supercell.
– Tab Attack:
** Chú ý tab này đánh dấu vào những mỏ mà bạn cần farm, mình full elixir nên không chọn.
– Tab End Battle:
** Chọn 10 sec. để kết thúc nhanh.
– Tab Donate:
**Gõ từ khóa xin lính, chọn quân donate, keywords a e clan hay xài, và ghi “war” vô mục “Do NOT …” để tránh cho nhầm lính.
– Tab Misc:
** Giữ số cup ở mức độ bạn mong muốn (500 – 1000 dễ tìm dead base).
=> Sau đó thì chọn “Start Bot” để chạy auto, lưu ý là auto dựa trên pixel để xác định nên cắm auto thì đừng táy máy gì hết cũng như không để chế độ tắt màn hình.
Và đây là kết quả của mình, chúc các bạn thành công ..!

Hướng dẫn sử dụng AUTO Farming (Mybot – Clash Bot) Clash of Clan

***Hướng dẫn đăng ký VPS, không cần dùng máy tính của bạn để cắm AUTO: CLICK

*Với các bạn đam mê Clash of Clan mà không có thời gian để cày cuốc đi fam, thì hôm nay mình sẽ giới thiệu các bạn cách sử dụng auto tự động fam CoC trên laptop hoặc PC.
- Với auto này chỉ trong vòng 24h các bạn có thể fam được 10 – 15 triệu Gold và Elixir, nếu các bạn boost nhà lính thì có thể lượng fam có thể còn cao hơn như thế nữa.

1. Yêu cầu trước khi cài đặt auto:

– BlueStack (cho PC), tải về tại đây.
– Microsoft .NET Framework 4.5, tải về tại đây.
– Microsoft Visual C++ 2010 (x86), tải về tại đây.
– Auto tự động fam Mybot (Clash bot v5.x), tải về tại đây.

2. Quá trình cài đặt:

– Chạy Star Bluestacks ngoài màn hình desktop, đợi xíu, lúc này nên để BS chạy không bấm vào gì cả, tránh tình trạng máy yếu tràn RAM phải khởi động lại máy.
– Vô Play Store – tải COC vào, nhập tài khoản Google Play của acc COC của mình vào khi GG Play Store yêu cầu.


– Cài đặt COC xong, vô game, chọn Sign-in góc trên bên trái nhập tài khoản GG Play của acc COC, khi được hỏi có “load old village” của bạn không, chọn YES.
– Vào lại thư mục BS đã giải nén, chạy file RUN ME LAST.bat, chọn YES (bấm chữ Y) nếu được hỏi – cái này khoản 4 lần.
– Lúc này độ phân giải màn hình của BS sẽ chuyển sang 860 x 720, vậy là xong.

3. Chạy auto Mybot (Clash Bot):

– Giải nén file MyBot, chạy Mybot.run (Application).
– Các bạn vào cài đặt Troops (lính – spell), Attack (chọn Deadbase hoặc LiveBase – nên chọn Deadbase để khỏi sợ bị report), cài Donate (chọn lính dnt – ghi yêu cầu – nhớ ghi từ khóa “war” trong mục “Do not Donate” để tránh dnt nhầm lính war),  Expert (chọn Donate và Request bên mục “Clan Castle Scheduler” để cho và xin lính Clan),…. Bấm “Start Bot” là Auto tự chạy.
– Các bạn nên test thử auto vài lần để chọn ra được những thông số cài đặt các bạn mong muốn.
– Lưu ý khi auto chạy không được làm gì cả, chỉ để im máy cho auto tự chạy, chỉ cần minimize BS là auto ngừng hoạt động ngay.
**Sửa các lỗi trong quá trình cài đặt:

1. Lỗi không cài đặt được BS:

– Khi hiện ra dòng này lúc cài đặt BS, “….Trying to determine the disk space for the installer…..”, thực hiện các bước sau:
  1. Dừng cài đặt.
  2. Đảm bảm máy đang chạy ngôn ngữ English.
  3. Chạy lại RUN ME FIRST.bat, gỡ hết cài đặt trong máy (trong Control Panel => Default Programs), xóa registry.
  4. Khởi động lại máy.
  5. Cài đặt lại file Installer của BS.

2. Lỗi không cài đặt được COC trong BS:

– Khi hiện ra dòng này lúc cài đặt COC ở Play Store, “….Error retrieving information from server…..”, thực hiện các bước sau:
  1. Tắt GG Play Store, vào Settings, vào More.
  2. Application Manager => All.
  3. Tìm GG Play Store => Force Stop => OK, Clear Data => OK.
  4. Tìm GG Service Framework => Force Stop => OK, Clear Data => OK.
  5. Xóa GG Gmail Account đã đăng nhập trong Account (Settings), chưa đăng nhập bỏ qua.
  6. Khởi động lại BS và vào lại GG Play Store tải COC.

3. Lỗi BS đã được cài đặt:

– Do bản BS cài đặt trước trên máy chưa bị xóa hoàn toàn, bạn đã chạy RUN ME FIRST.bat nhưng không xóa hết => bạn phải xóa thủ công bằng tay.
  1. Xóa trong Default Programs (Control Panel).
  2. Chạy Run => regedit => HKEY_LOCAL_MACHINE => tìm thư mục BS và chuột phải Delete.
  3. Tắt registry editor, khởi động lại máy, làm lại từ đầu với bước RUN ME FIRST.
Chúc các bạn thành công với auto farming này!
(Nguồn: mybot.run)

Thứ Năm, 25 tháng 2, 2016

How to Recover or Fix Bricked Android Samsung?

Rooting my Android Samsung phone went well, but I've tried to flash a custom ROM and now I think I've bricked my phone. Is there anything I can do?

Before we talk about “How to unbrick Samsung Android Phone”, let me clear something with all you guys, most of the people don’t know what a bricked phone actually is. A bricked phone means – your phone won’t turn on at all. A phone stuck in a boot loop or a phone that boots directly to recovery mode is not a bricked phone. If your phone is actually bricked that means it won’t open at all, neither you can boot into the recovery mode nor into the download mode, you cannot unbrick it on your own.


Most people use the term "bricked" improperly. A bricked phone means one thing: your phone won't turn on in any way, shape or form, and there's nothing you can do to fix it. It is, for all intents and purposes, as useful as a brick. A phone stuck in a boot loop is not bricked, nor is a phone that boots straight into recovery mode. These are things you can usually fix, and they're a lot more common than a truly bricked phone. If your phone is actually bricked, you won't be able to fix it yourself.

So, how do you recover and fix your bricked android Samsung galaxy phone.

Recover and fix your bricked android Samsung phone easily with the best Dr.Fone for Android. Trust it, Dr.Fone for Android not noly can recover those lost or deleted data incuding contacts, text messages, videos, photos, apps, calendar, whatsapp chat data from your android smartphone, but also can recover and fix your bricked android samsung galaxy phone safely and quickly just follow the next simple steps below:

Dr.Fone for Android try trail version download below:


Use Guide to Recover and Fix Bricked Android Samsung:

Step 1: Connect your bricked android Samsung to the PC

To start with, run Dr.Fone for Android and then plug your bricked Android samsung phone to the computer. After that, click on Fix My Bricked Phone on the lower right corner of Dr.Fone for Android.


Step 2. Get Bricked Android in Download Mode

Please choose a kind of problems that you are faced with. For instance, click "Stuck in the start screen" to go on.


At this time, the screen will ask you to get the device into Download Mode manually. Power off your bricked Android phone completely. Then press and hold "Volume Down + Home + Power" button on your phone together. After that, your phone will enter "Download Mode".


Step 3. Detect the Device

After the phone enters Download Mode, your cellphone or tablet will be detected at this step and it is necessary to connect the device to the computer so that the software will display the your devie model and Android version on the interface.


Step 4. Restart the Device

The program will download the recovery package to help you recover the device and make it back to the normal state. After several seconds, your device will restart as the normal one. Thus, you can turn to the device to check whether it can work or not.


More Related Articles:

How to Recover Data Contacts from Android after Update

How to Recover Data Contacts from Samsung S7 (Edge)

How to Recover Lost Photos from Samsung Galaxy J1

Thứ Sáu, 19 tháng 2, 2016

galaxyyarchive.info turns to galaxyyarchive.blogspot.com

It has now been 4 years since founding the biggest Galaxy Y blog - GalaxyYArchive and most likely 90% of you have moved on to newer devices and barely even visit the website nowadays.

It has been a fun ride, but I have decided to stop paying for the domain name galaxyyarchive.info and use the original one provided by Google's Blogger platform - http://galaxyyarchive.blogspot.com

For those of you that visit the website frequently to look for ancient content whether it is converted ARMv6 apps, general tips and tricks for gingerbread devices, or even for the Galaxy Y, you should start visiting http://galaxyyarchive.blogspot.com starting from today. The original domain will still work for a couple of more days and redirect you to http://galaxyyarchive.blogspot.com

Those of you that are still interested in Android modding can drop http://droid-tips.com a visit and check out the articles.

Thứ Năm, 18 tháng 2, 2016

Samsung S6 Android 6.0 upgrades exposure with better built-in browser

[Abstract] The new system will bring about a new Internet 4.0 browser to join a new private browsing mode, users can use the new browser selection will not save any history, data, Cookies.


While Samsung said it would soon for the Galaxy S6 and Galaxy S6 Edge released Android Marshmallow update, but the new firmware is still nowhere to be found. And in addition to the two flagship, many other Samsung device users are also waiting for the same update.

Samsung's Android 6.0 Marshmallow update also accompanied by new TouchWiz interface, Samsung today introduced the Galaxy device after upgrading Android 6.0 will get those new features. (Recover Samsung Data after Android 6.0 Update)

First, the new system will bring about a new Internet 4.0 browser, though many users prefer to use Chrome, but the system is still the same built-in browser worthy choice. In addition, the new browser will bring a new private browsing mode, users can use this new browser will not save any selection history data, Cookies, but you can still save a bookmark. And these data are stored in a separate space, and protected by KNOX.


In addition, the automatic logon security feature enabled, when the page is set to automatically log on, each time you log need to verify the fingerprint information.

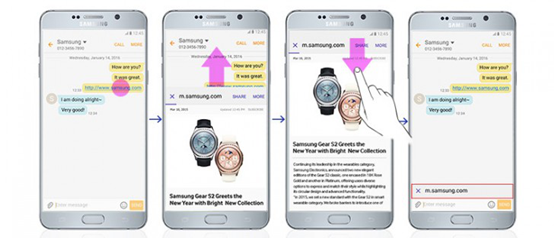
Cross App features are also worth mentioning in this service allows users to easily browse back-office applications, such as when there is a message, or e-mail contains a link, the user can pop-up display linked pages through gestures, while requiring only lightly brush can close pop-up box.


Although Cross App function and can be connected to interactive media, but currently only supports TouchWiz interface that comes with the application, including SMS, email and web capabilities.

In addition, the new updates have brought Marshmallow Gear VR device better support for the new power-saving mode, MIDI protocol, and local access control and other applications.

Related Articles:

How to Recover Data Contacts from Android after Update


Embrace your inner gaming hero with Gamer ID

If you're like me or many other gamers out there, you love the feeling of escape that comes with playing games. Immersed in a gaming world without any distractions, I can simply focus on one thing: winning. In this alternate world, I’m not Ben, product manager at Google. I’m Caldorf, destroyer of enemy bases; slayer of zombies.

Over the next few weeks we’re rolling out Gamer IDs to Google Play Games. Gamer IDs give you the ability to create a gaming persona, so you too can embrace your inner gaming hero. You can customize a unique Gamer ID and select a Gamer Picture to create a whole new gaming identity.


For new users signing into your first Google Play Games integrated game, and for existing users signing into a new Play Games integrated game, you will create your Gamer ID and select one of 40+ avatars for your Gamer Picture. You can choose to make your game activity public or private, and decide if other gamers will be able to associate your Gamer ID with your email address or name. Gamer IDs are unique, and to claim yours right now you can go to the Google Play Games app.

In addition, we’re making it easier and faster to start playing games. With auto sign-in, you’ll be prompted to sign-in once per account, rather than once per game, and you’ll automatically be signed in to most future games.

With your new gaming identity, you can battle monsters as the valiant gamer you truly are, and be duly recognized for your accomplishments across Play Games experiences such as leaderboards. And who knows, someday your Gamer ID could be as recognizable as Mystik, Mew2King, or PewDiePie.

To learn more about setting up your gamer ID please review the Play Games sign-in help center article here.

Posted by Benjamin Frenkel, Product Manager, Google Play Games

Thứ Tư, 17 tháng 2, 2016

How to Recover Data Contacts from Android after Update

Updates or upgrade operating system for your android phone or tablet can be exciting events. They usually bring new features and functionality, as well as increased performance. Your device normally informs you when an update is available, To get the best performance and features from your Android smartphone or tablet you should make sure you're always running the very latest software available for it, not just in terms of apps but also the Android operating system. No matter your android mobile phone is HTC, LG, ZTE, Sony, Huawei, Nokia, Moto or other brand android phone.


But if the Android system update error appeared to you, and you found that many important android contacts, videos, photos, text messages, calendar, notes, apps and more have got lost. You must want to need a way to recover those lost contacts, videos, pictures, apps, calendar, bookmarks, notes, apps, SMS from your android HTC/LG/ZTE/Sony/Huawei/Nokia/Moto/Samsung/Xiaomi/Oppo after android OS update/Upgrade.

So, next is your best choice to recover lost data contacts from android after android update/upgrade with Android Data Recovery software tool:

But what is the Android Data Recovery?

The World's 1st Data Recovery Software for Android Smartphones, How the Android Data Recovery works? Android Data Recovery can restore any Android lost data whatever reasons-operation system corruption during software updates or mew ROM flashing,accidental deletion,screen broken and more. Support all popular brands of Android phones and tablets, like Samsung, HTC, LG, ZTE, Sony, Motorola,ect.

Want to try it?

Please download the free trail version below:


Easy Steps to Recover Lost Contacts, Videos, Photos, Text messages, Notes, Apps, Bookmarks, Calendar from HTC/LG/ZTE/Sony/Moto/Samsung after Android OS Update or Upgrade:

Step 1: Connect Android Phone to Your Computer and Enable USB Debugging

But first, you need to connect your Android device such as Samsung Galaxy to your computer via a USB cable. Then you need to enable USB debugging before scanning the device. You can follow the way below to do it:


1)For Android 5.0, 6.0 or newer: Move to "Settings" > "About Phone" to tap "Build number" seven times for "You are now a developer!" signal. Then, move to "Settings" > "Developer options" to turn on "USB debugging"
2) For Android 4.2 to 4.4.4: Enter "Settings" > "About Phone" > Tap "Build number" for several times until "You are under developer mode" appears > "Settings" > "Developer options" > Check "USB debugging"
3) For Android 3.0 to 4.1: Enter "Settings" > "Developer options" > Tick "USB debugging"
4) For Android 2.3 or earlier: Go to "Settings" > "Applications" > "Development" > Tick "USB debugging"


Step 2. Select Types of Android Data to Restore and Mode


Step 3. Start the Program for Deleted File Scanning

Click Allow to entitle Android Data Recovery to get going. Then, choose Start. And if not, tap on Start only.


Step 4. Preview and Recover the lost data You Choose (Contacts, Messaging, Gallery, Videos, Audio or Documents)

The result will be showwed you as below, and the red result are the lost data you want to get back, just select the data you want and click "recover" to save it on your computer.


More Related Articles:

Android 6.0 Update- Recover Samsung Photos, Videos, SMS